I think I will go to New York City for the weekend. Yes, that sounds like a great idea. Two Nikon cameras a point and shoot, 4 rolls of film, 3 memory cards for the DSLR, a tripod, and some friends.
Be back on Sunday with some great photographs and some new articles.

Friday, October 30, 2009
Photo Contest
This past Wednesday I went home. Metaphorically speaking that is. I went back to where part of my history with photography began. Holyoke Community College, where I studied photography. Holyoke Community is not the only educational facility that I have been studying photography at. However, it is where relationships were formed. My business partner fellow alumi Tim Lastowski and I met at HCC. As well as a few other really good friends. My time at HCC was invested in fully immersing myself into photography. I became close to the professors I now refer to as friends. Professors that have essentially helped me become what I am today. For had it not been for them, the program they run, and their curriculum, I would not have received the education that I have.
Robert Aller Photography Program Director, friend, and outstanding photographer/professor has spent the last couple, if not MORE years building up this new lab and the photography program. Frank Ward, Associate Professor, friend, and travel/social documentary photography has been there working just as diligently as Aller in providing an outstanding education to the students that choose to hear them. Allar and Ward together with professor/lab technician Christopher Lizon provide students with the fundamental basics of photography, as well as going above and beyond their responsibilities as professors to ensure their students get the best education possible.
I had the honor of being voted as the Grand Prize winner for a photograph (out of 3) submitted for the photo contest they were having in conjunction with the MAC opening.You can view the images of mine, Tim's, and another student by vising Franks Ward's Photo Blog It was a pleasure to have been a small part of the MAC opening. It gave me/us (Tim and the business-True Resolution) the chance to meet and speak with some cool, interesting, great individuals. One particular photographer/business owner with whom we had the privilege to speak with was Jim Gipe, owner of Pivot Media Jim is a fantastic photographer and with an outstanding business sense. Jim gave us a few pointers to help guide our ideas and business in the right direction. I just want to give a special thank you to Robert Aller, Frank Ward, Chris Lizon, and Jim Gipe for their words, support, and inspiration.
Wednesday, October 28, 2009
Lets talk Flashes…
So you’re ready to purchase a flash for your DSLR. Not sure what to get? or have a few ideas in mind, but are still a little unclear? Well ,we will discuss some great flashes from low budget to some of the best flashes on the market.
Before you make your purchase, you need to have a few things in mind. What are you going to be shooting, how are you going to use the flash, (shooting on camera or off camera with wireless triggers and receives, or tethering with cables), how many flashes are you going to need, which flashes are compatible with my DSLR, and what to look for when purchasing a flash or multi flash set up. Most importantly, how much power do you need from your flash? Having the answers to these questions will make purchasing your flash that much easier. Running a single flash on camera will be a lot less cheaper than running a multi flash set up with wireless triggers and receivers.
Setting up a multi flash system requires more than just the flashes and triggers/receivers. You need to purchase light stands to hold the flashes. At the very least some sort of device/bracket that can hold the flash. You need to purchase brackets for the flashes to be adapted to the stands. Then you can start thinking about accessories such as umbrellas to either diffuse or bounce the flash. Umbrellas  can function like a soft boxes when you use a white umbrella to diffuse the flash. There are multiple advantages that make using a multi flash system very practical. Having a multi flash system allows you the freedom to take your creative lighting set up just about any where and work remotely. It is a great set up for location shoots. The next advantage to a multi flash system is there is no need for the very expensive power packs. You can power your flashes with rechargeable batteries. This eliminates the need to purchase power packs. As most power packs can be very expensive. Some speed lights however can use mini power packs. Canon speed lights have a great little power pack that can allow the batteries and camera the freedom to operate longer using the batteries and the power supply together. This saves on battery usage allowing you to shoot that much longer without changing batteries out.
Here is a list of key features to think about when setting up your flash system/s.
-Recycle Time: Flashes do not recycle as fast as studio strobes do. However, having a fast recycle time is very important to your flash.
-Flexibility: A flash with a movable, tilting, rotating head is extremely important in controlling the direction of your light. There will be certain instances where bouncing your flash off the ceiling or a wall next to you will arise. Most flashes also have a zoom feature that works in conjunction with your lens, allowing the flash to change the distance and size of the beam coming from the flash.
-Bracket-ability: Get yourself a bracket that allows you to move the flash off your hot shoe. This is a very popular and common way of placing your flash on your camera.
-Multi-Flash Capability: This is pretty straight forward. Using a speed light as a commander, or by having a trigger that is connected to a few receivers will allow you to set up multiple flashes. This can yield professional results and take your boring, mundane, average looking snap shot into a professional portrait. Check out the Strobist for some awesome ideas, concepts, and uses on Multi Flash Systems.
-Power: The amount of power a flash out puts can be found in the guide number that each flash is set to. The higher the guide number, the more power the flash puts out. What is the guide number besides a number indicating power? Well a guide number indicates the greatest flash to subject distance. Here is a more comprehensive and mathematical approach to using the guide number. Keep in mind, the more power, the better the flash…
Now, the next big subject we need to cover is exactly which flash is best for you, your shoots, your needs, and very importantly, your budget. Flashes can vary in price drastically based on their functions. Nikon, most notably has a creative lighting set up. If your budget allows you to, then this is a great way to go. Their Nikon SB 900 is widely po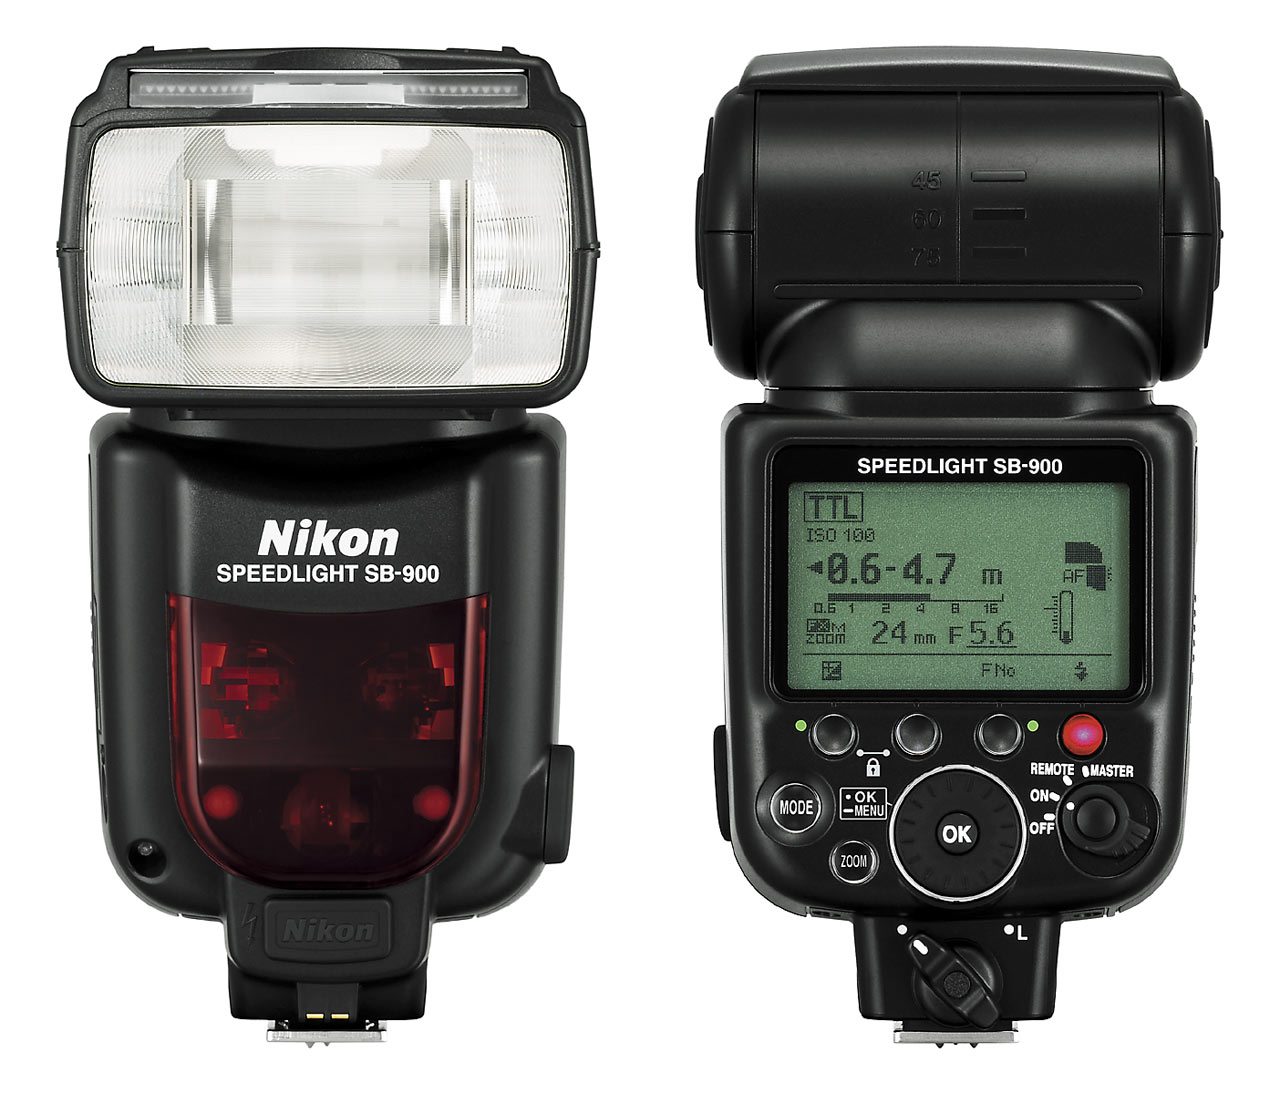 pular and highly reviewed flash. The SB 900 sits at the top of their list of flashes. It has an impressive list of features. The street price is around $470.00 This makes running a creative lighting system a much more pricier system. For a full list of Nikon products you can view the Nikon website. Speed lights, like I mentioned above allow you the flexibility to set up great location shoots without worrying about battery packs. Plus they are a light weight small flash that yields pro results.
In contrast to Nikon’s wonderful list of Speed lights, Canon also has an impressive set of speed lights. Their speed lights are not as flexible as creative lighting system like the Nikon set up. However, this is easily fixable by creating your own system by running wireless triggers and receivers. I have used both Speed lights (Nikon and Canon) and have found that the Canon speed lights function wonderfully.  The 580 EX II is a great flash. I have used it numerous times in shoots and found that it does a fantastic job and compares to all the Nikon speed lights, if not slightly surpasses the SB 900. This set up Canon and Quantum Turbo Pack is what we we have been using for location shoots. The added battery pack does an outstanding job. This system is comparable to the Quantum Instruments set up. This is a very pricy set up that is very popular. I have not yet used a Quantum system. But from what I have heard, read, and seen, it is a worth while investment in portability and versatility.

Aside from the industry leading flashes that I have discussed so far, there is an entire list of flashes that are equally as good. Lesser companies have been pumping out speed lights/flashes that offer the same features and can produce the same results for a lesser price. Olympus, Pentax, Sony, Vivitar, Sigma, Sunpak and Metz all have great flashes that perform just as well as the higher priced industry leaders if not better. The current market and industry trends have left the smaller companies trying to compete really agressivly by marketing flashes that produce the same results as their higher priced big brothers (i.e Nikon and Canon)
Now before we go any further and get into all the cool toys for that are out for flashes, lets talk about that old flash that is kick around your equipment. You know, that old flash meant for SLR’s not DSLR’s. Did you know a piece of equipment exists that allows you to use your older slr flashes with your DSLR? Yes, its true. The company Wein produces a fantastic little device called a Hot Shoe Safe Sync. B&H Photo and Video has them listed at great prices. This little device allows you to connect your old flash safely to your DSLR with out worries of the volts damage or frying your camera or vice versa with the flash.
Ok, so now you’re starting to get excited about getting that flash and or multi flash system. Maybe you already have a few flashes kicking around and you just need some new devices, toys, accessories, products to increase the dynamics of your shoots. There are quite a few products out there that allow you to get as creative as you possibly can and produce some visually dynamic and appealing photographs that will allow you to stand out.
The first product I am going to start out with is the most current product that I am seeing used more and more frequently. The Ring Flash 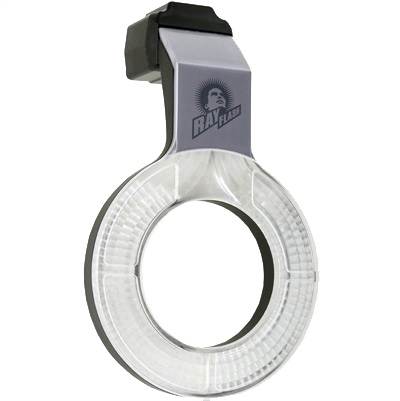 This is a popular device that works using the flash while it surrounds the lens. It omits light in a circular patter at the very front of the lens. It produces a nice even shape of light that evenly fills the subject. This is a very budget friendly way of having a beauty dish. Ray Flash
Beauty dishes are also a very popular piece of equipment that is being used by professionals all over. Beauty dishes like ring flashes evenly disperse the light that is illuminating the subject.

Honlphoto is another leading company that makes accessories and modifiers for your flashes. They have a wide variety of devices that mount up to your flash. From honey comb grids to snoots, they have products that will allow you to bounce, diffuse, and position light according to your desires.

Interfit is another great company that has quite the collection of useful light modifiers. They have an impressive collection of honey comb grids, including a gridded snoot. Interfit also has two strobe kits available.
The more popular items that maybe familiar by Interfit are their Strobies.

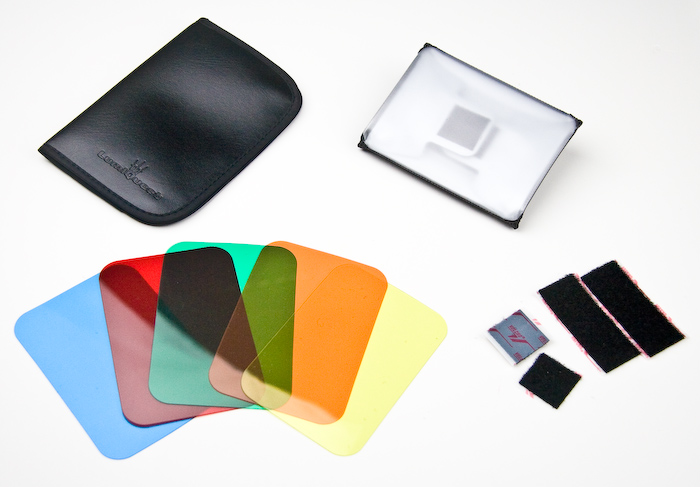
The next biggest company that I have been watching for a little while is Lumiquest. Lumiquest has a number of diffusers, bounce cards, light modifiers and color gels. Yes, that is right colored gels for flashes! or speed lights, which ever you have. Lumiquest even has a link on their site that explains how light modifiers work. A great visual tutorial that explains the use of their products as well as how to bounce your flash.

Below is a list of companies that make wireless triggers and receivers.
The products and companies that have been featured in this article all exist to give you the freedom to create, control, and modify your light source. The creativity to do so is up to you. If you feel that maybe a flash system is not what you are looking to work with or you have a higher budget. Then maybe the perfect option for you to go with would be studio strobes.
If you are science nut, or a real techie, then you should check out the Inverse-square law.
Tuesday, October 27, 2009
Autumn HDR and more…
Here is this past week in photographs. This is a prime example of why I love living in the Northeast portion of the U.S. The autumn season gives us such spectacular foliage, light, and the opportunities to make photographs that really command a second look.
Holyoke, MA


Wedding and portraits…
When I am not writing an article, researching for an article, or creating/making photographs, I am shooting for clients. This past year has brought about a great number of changes. Leaving Boston and Cambridge to come back to Holyoke to open up a studio/business True Resolution, to being featured in a few publications, I have formed a partnership with a great friend to further enhance, develop, and launch our passion for photography.
")
")
")
")


Saturday, October 17, 2009
Nikon D3s
I received an email two days from a photographer and friend of mine. It was a follow up to an exhibit that is coming up. Included was a link asking if I had a chance to see the new D3s. I have not. But, I am very very impressed with this camera. I am not going to get into to many technical details, as I have not actually used this camera. What I will mention are the key features that complete this digital master piece.
Key features that make this camera stand out (from NikonUsa.com) :
Nikon-original FX-format CMOS Sensor
Newly engineered for striking image fidelity and low-noise, optimizing pixel size and count in a 12.1-megapixel sensor to produce extraordinarily rich files.
Low Noise ISO Sensitivity from 200 to 12,800
Renowned low-noise performance at 12,800, plus expanded settings to an astounding ISO 102,400 (equivalent) and ISO 100 (equivalent).
1,005-Pixel 3D Color Matrix Metering II
Nikon-pioneered RGB metering includes color information to intelligently determine more accurate exposures.
100% Viewfinder Coverage
Dual CF Card Slots with Overflow Backup and Copy Options
Approx 4,200 Images per Battery Charge
The one thing that puts me off about this camera is the 12 mega pixels it is limited to. I feel this way because the features that are packed into this amazing body are semi limited to the pixels capabilities. Had they included a sensor that is capable of 20+ then I think this camera would be one of the greatest Nikon DSRL models they have yet to produce. However, being able to have an ISO that reaches 102,400 is pretty much out of this world. I am very curious to see what am image looks like at this ISO setting. I am even much more curious to see what conditions (i.e time of day, quantity of light) a camera of this magnitude can function in. Unless you are shooting and bracketing multiple shots, (HDR) then a camera like this would render any tripod useless. The street price for the D3s is surprisingly lower than I expected at a mere $5,199.00 This is just change compared to other pro level cameras. Yet very affordable. If I hadn’t been so persuaded by Canon, I might consider upgrading to the D3s. Regardless of what I am shooting with, I think this is a great camera with outstanding features. A camera worth upgrading to.

Friday, October 16, 2009
Black and White: To convert, why, and how.
There are qualities and characteristics of black and white photographs that still command a great deal of attention. Black and white photography has seen some amazing transformations. From the days of black and white film, the darkroom with black and white prints, till the most update ways of converting digital files to black and white, and the newest products for printing black and white images from digital printers, we are in a period where black and white is easier to work with. A few simple clicks of a mouse, some adjustments, and setting up your printer to print black and white, (some printers have multiple black inks) is all that is needed to produce some incredible photographs.
Everyone knows what makes a black and white photographs so appealing. Well composed, properly lit, dynamic photographs with subtle tones, gradations from the whites to the blacks, strong blacks, beautiful shadows, bright whites, these are all qualities that need to be present in your photographs in order to have a beautiful black and white image. Of course, you need to see an image in black and white before you can make it black and white. Sound confusing? Well, it’s actually much more simple than it sounds. Photographers need to be able to see the final image as they are setting up their composition. You need to ask yourself, is this going to look good in black and white? The answer needs to be yes. Not every image works in black and white. Some photographs are meant to be color, while others need to be black and white.
This past year I have had the chance to meet some amazing photographers. Each of which bring some one great quality to the photography industry. I even had a chance to meet a photographer, (who will remain nameless for this article) who has spent her entire career, until this past year, working entirely with black and white film. This past year was the first time in her career that she started shooting color. Needless to say, I was impressed that someone could spend nearly 30 years shooting nothing but black and white film. Her subject matter and focus with her photography (social documentary) allows for some interesting images that when combined with black and white, we are left with photographs that have more visually appealing qualities outside of the subject matter.
For a recent job me and my business partner were contract to shoot, we were discussing the use of film, cameras, and how we would approach the shoot. It was suggested we shoot black and white film. To which I responded, “why invest in black and white film when we have color already and can just shoot, process, and scan the film, then convert to black and white digitally?” This made a valid point in which saved us some money and gave us the chance to work on converting the images to black and white.
There are numerous ways to convert images to black and white. Some of which are straight forward and do not produce the best looking tones. While other ways of converting allow you more choices in setting the over all look of the image and the tonal shifts from the deepest blacks to the brightest whites. For example in photoshop, you could desaturate the image, which simply removes the color from the photograph. Next you can go into the channel mixer and make your conversions this way. With the more newer versions of photoshop CS3 and up, there is a feature under Image > Adjust > Convert to black and white that allows you a few options to set the reds and oranges. Now, with black and white photography, the quality and color of light is of little importance, except for how much light is needed to make the proper exposure. Then why does changing the reds or oranges make a difference? Well in doing so, you can alter the tones of the blacks and give the image a slightly different visual feel. For example, say you convert a portrait to black and white, sliding the red bar to either side would drastically alter the tone of the persons lips, one side goes deep where as the other goes very light. Of course this type of editing is solely up to you.
In camera black and white: This is the black and white that is produced when using the camera to convert a color image to black and white.

Desaturate: Notice how the photograph has a large amount of grey, it appears to be more neutral in the tonal shifts and an even gradation between the whites to blacks.

Channel Mixer: This image has a slight gradation and is not as grey in appearance. The background is not as dark. To used the channel mixer you go Image>Adjust>Channel Mixer, set values at 60-20-20>click monochrome

Gradient Map: The gradient map does a great job of converting an image to black and white. It is a semi preferred way of converting. Take note that the blacks are strong and the whites a brighter giving a nice gradation in the tones. The photograph is not as grey. The gradient map has the strongest blacks out of all the other conversions.

Black and white action: This black and white is my day to day process for converting photographs to black and white when I am not using the gradient map. I developed this action over the summer when I was asked to convert an set of portraits to black and white.

I was given two 8x10’s of the same image. I was asked to come up with a 3rd 8x10 that had elements of both 8x10’s. Basically what I needed to do was get nice whites, rich blacks, and keep the image from having too much shadow. In the end, I had created an action that reduces the shadow and gives great tones to skin while retaining the whites and blacks, without producing any neutral greys.
I have shown different ways of converting an image to black and white. However you chose to do so reflects the quality of your photograph. The numerous ways that exist to convert an image all have different variations that produce somewhat different looks. The overall final look of your image and the choice you make in converting the image is dependant upon the method you have to convert your image. You may want deep blacks and strong brilliant whites, or perhaps you want some grey to the image. There exist different steps you cant take to make any of these variations happen. I generally tend to use my action, as it has yields some outstanding prints in the final output of the photograph. This action and an entire package of actions will be available for purchase very soon.
Wednesday, October 14, 2009
For the client.
What could be a better afternoon/evening than sitting in a beautiful cafe in a small New England town editing a clients shoot? Well, for me, I can not think of a better way to spend a few hours working. The fall foliage falls around me as I sit tediously removing elements of a shirt to get a nice solid color instead of the Halloweenish pattern that was on the shirt to begin with. In between the path selections of the candy corn, I find myself reminiscing this past summer. How quickly autumn has come. The days are getting shorter, but the work load is growing. A few projects have been lined up. Next weekend I will be exhibiting some photographs at a one day event in Holyoke, Mass. The photographs are from a project I began working back in April of this year. Over the past few months the project took quite a few turns and ended up becoming a pretty interesting body of work.
As the project is coming to an end, shooting and editing wise, I am also thinking about the little things that have been involved in the final product. I started my work load this afternoon by removing elements of a design from shirt. Which has now lead me to removing distractions and objects from one of the photographs that is part of the exhibit and a special request piece for my other client. Removing objects in photoshop, for the most part, is fairly easy. However, thinking back to the shoot, I remember thinking to myself, I should ask for that bag to be removed. Nothing wanting to prolong the shoot to stop, recompose, and remove elements from the space, I kept shooting. Now, I wish I had taken the extra few seconds then to remove the bag. As a few extra seconds on that day would have spared me about 30 minutes today. So, the moral of the story, yes it maybe easy to remove things in photoshop during post production, but it is much more time and budget effective to control this while shooting and remove the distractions before the photographs are made.
Getting back to the shirt with the candy corn and other elements, this is a far more complicated post production clean up than removing a bag. It was requested that the shirt be worn, however, upon viewing the images, it became apparent that the shirt wasn’t as flatter as one thought to be. Is this a problem? Not by any means at all. This is merely a contrasting point to show the difference between being able to control what elements can be removed before a photograph is made vs. when a photograph is made and the elements or objects need to be removed. A case in point like this, the shirt looked good, but within the context and composition of the photograph, the shirt is not as flattering. A situation like this commands a certain level of retouching and post processing be done to remove the elements and objects.
My piece of advice, remove the objects and elements that are within your control before you shoot to condense the time invested in post production clean up. After all the point of post production and editing your final images is to give them your essence, not to collect and remove trash. And when you’re given a request to remove objects from a shirt, then understand that this was and is a situation that wasn’t as easily foreseen. I am always happy to explore edits like cleaning up a shirt. It has given me a few creative ideas to work with.

Vega Yoga Holyoke, Massachusetts
Monday, October 12, 2009
Interesting
I have been saying it for some time now, we have a lot to look forward to with the advancements photography has been making in the more recent years. This is a shinning example. A must read article! FRANKENCAMERA There is one thing that this article doesnt specify, and that his how this camera has a key feature that acts on the principals of HDR photography. Regardless, this is one hell of an advancement!
Monday, October 5, 2009
Photography tutorials: Landscape
Here are a few interesting videos that will inform and educate you.
Landscapes: Intro
Landscapes: Equipment
Landscapes: Sunset
Great Video!
Photoshop Tutorial: Vanishing point
Landscapes: Intro
Landscapes: Equipment
Landscapes: Sunset
Great Video!
Photoshop Tutorial: Vanishing point
Subscribe to:
Posts (Atom)